Last updated on June 16th, 2023 at 08:14 am
In order to grow Turkey Tail mushrooms, you will need the following supplies:
- Containers: Plastic bags or jars to hold the substrate where the mushrooms will grow.
- Turkey Tail spores
- Substrate: Hardwood sawdust mixed with water and nutrients like gypsum.
- Turkey tail spawns: The living mycelium culture used to inoculate the substrate.
- Pressure cooker: To sterilize the substrate.
- Thermometer/hygrometer: To monitor temperature and humidity levels.
- Misting bottles: To keep moisture levels stable.
- Personal protective equipment (PPE): Gloves and masks when handling substrates.
- Sterilization solution: 70% isopropyl alcohol to sterilize surfaces and equipment.
- Humidifier: To maintain proper humidity levels.
- Heater or fan: To control temperature fluctuations.
- Grow light or natural sunlight source: To provide proper lighting conditions.
- Sharp knife or scissors: For harvesting the mushrooms.
To begin, you will need to purchase Turkey Tail spores or a culture from a reputable dealer. Then, you will need to sterilize your grow medium. This can be done by boiling the dowels, sawdust, or straw for 30 minutes. Once the growing medium has cooled, you will need to add the Turkey Tail spores or culture.
Next, you will need to find an enclosed growing area. This could be a plastic storage container with holes drilled in the top for ventilation, or a terrarium. The growing area should have a humidity level of at least 80%. You can maintain the proper humidity level by misting the inside of the growing area with water several times a day, or by using a humidifier.
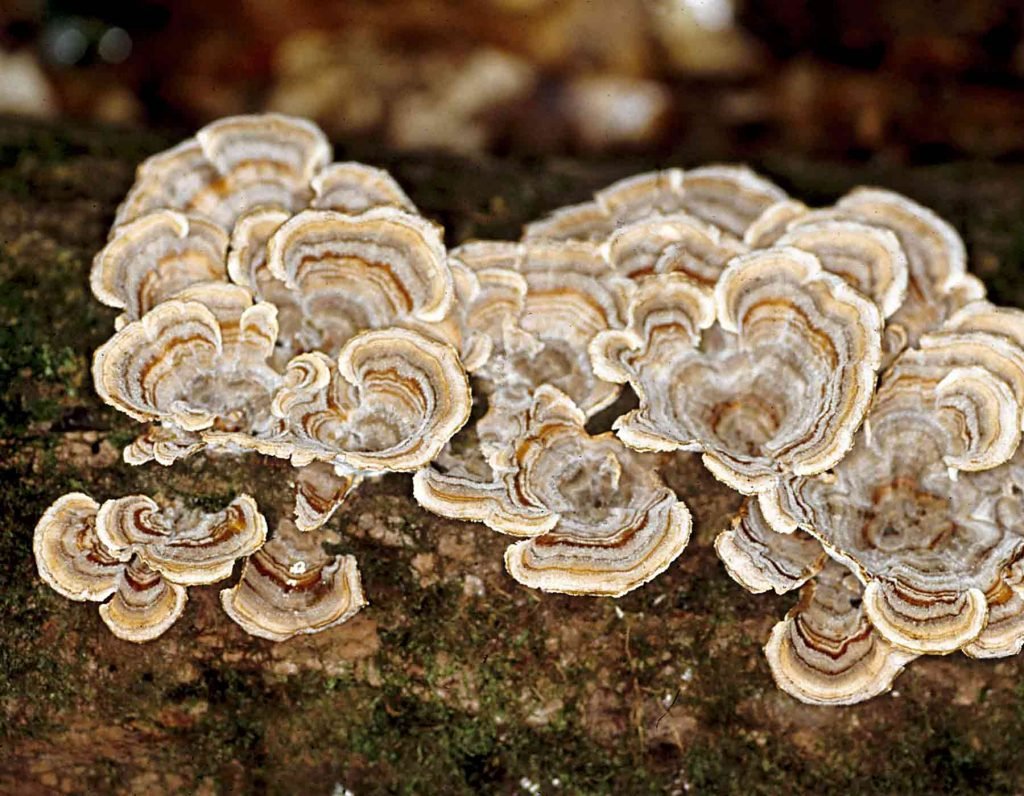
Table of Contents
Setting Up Your Growing Space
Before getting started with growing turkey tail mushrooms at home, it’s important to choose the right location for your mushroom farm. This space should be free from direct sunlight but still bright enough for natural light to penetrate through.
Temperature is another important factor that needs to be taken into consideration when setting up your growing space. When it comes to materials and equipment needed for growing turkey tail mushrooms at home, there are a few key items you’ll need including substrate (such as hardwood sawdust), spawn (which contains turkey tail mycelium), a container or bag for incubation (like a grow bag), and something like newspaper or coffee filters to allow for proper airflow.
Preparing Your Substrate

Substrate refers to the material that your mushrooms will be grown in. For turkey tail mushrooms, hardwood sawdust is one of the best options to use.
It’s important to make sure that the sawdust is free from chemicals and pesticides so that it doesn’t negatively affect your mushroom growth. To prepare your substrate, you’ll need to sterilize it by boiling it in water for at least an hour.
Once sterilized, you can add in turkey tail spawn (which contains mycelium) and mix well before packing it into a container or bag for incubation. Maintaining proper moisture levels is crucial during this stage as well – aim for 65-75% humidity by misting daily with a spray bottle if needed.
Overall, growing turkey tail mushrooms at home is not only a fun hobby but also a great way to have access to fresh and organic mushrooms with incredible health benefits. With some patience and attention to detail, anyone can cultivate their own little mushroom farm right at home.
Getting Started: Setting Up Your Growing Space
Choosing the right location for your mushroom farm
Before starting your turkey tail mushroom farm, you need to choose the right location. This is not as easy as it sounds. You need to ensure that the location is not too hot, too cold, too dry, or too humid.
The ideal temperature range for growing turkey tail mushrooms is between 55-75 degrees Fahrenheit. The humidity level should be around 80% – 85%.
Now, don’t make the mistake of thinking you can just set up your mushroom farm in a shady corner of your backyard and call it a day. No way!
You need to ensure that your mushroom farm is not exposed to direct sunlight or any drafts. The area should also be protected from animals such as rodents or birds that could potentially damage or eat your mushrooms.
Materials and equipment needed for growing turkey tail mushrooms
When it comes to growing turkey tail mushrooms at home, you will need a few essential materials and equipment to get started. Firstly, you’ll need some containers (plastic bags or jars) to hold the substrate where the mushrooms will grow. Secondly, you’ll require a substrate which is made up of sawdust & wood chips mixed with water and nutrients like gypsum.
In addition, you’ll also need some turkey tail spawn (the living mycelium culture used to inoculate your substrate), a pressure cooker (to sterilize the substrate), a thermometer/hygrometer (to monitor temperature and humidity levels), and misting bottles (to keep moisture levels stable). Don’t forget about personal protective equipment (PPE) such as gloves and masks when handling substrates.
Tips for creating the ideal growing environment
Creating an ideal growing environment for turkey tail mushrooms can be challenging but with proper planning and attention to detail, you can make it happen. You need to ensure that the growing space is clean and well-ventilated.
Sterilizing all surfaces and equipment that will come into contact with the substrate using a 70% isopropyl alcohol solution is also recommended. Maintaining proper temperature and humidity levels is key for successful mushroom growth.
To achieve this, you can use a humidifier or misting bottles to keep the environment moist and a heater or fan to control temperature fluctuations. Additionally, you should also consider using a grow light or natural sunlight source (if your growing space allows it) to provide proper lighting conditions for your mushrooms.
Preparing Your Substrate
Understanding substrate options
When it comes to growing turkey tail mushrooms, the type of substrate you choose is important. There are a variety of substrate options available, including hardwood sawdust, straw, and even coffee grounds. Hardwood sawdust is one of the most popular choices among growers thanks to its high nutrient content and availability.
Straw is another option that can work well, although it tends to be less nutritious than sawdust. Coffee grounds are also a viable option for those looking to experiment with different substrates.
Step-by-step instructions on preparing your substrate
Once you’ve chosen your preferred substrate, it’s time to prepare it for inoculation. Start by mixing your substrate with water in a large container until it reaches the desired moisture level – usually around 60%.
This will help ensure that your turkey tail spawn can colonize the substrate effectively. Next, sterilize your mixture using a pressure cooker or other method in order to kill off any unwanted bacteria or contaminants that might interfere with mushroom growth.
After you’ve sterilized and cooled your prepared substrate, you’re ready to inoculate it with turkey tail spawn! But before doing so, make sure everything is clean and sterile; contamination at this stage could mean disaster for your mushroom crop.
Tips for maintaining proper moisture levels
Maintaining proper moisture levels is crucial when growing turkey tail mushrooms at home. If the environment becomes too dry or too wet, it can negatively impact growth and yield.
To prevent this from happening, make sure to monitor humidity levels regularly with a hygrometer or similar device – aim for around 90% humidity during colonization and around 70% during fruiting. Additionally, consider investing in a humidifier or spray bottle if necessary in order to maintain ideal humidity levels throughout the entire grow cycle.
Keep in mind that too much moisture can be just as detrimental as too little, so it’s important to find a balance that works well for your specific setup. With a little trial and error, you’ll be able to find the sweet spot for optimal turkey tail growth.
Inoculating Your Substrate with Turkey Tail Spawn

Understanding spawn and its role in mushroom cultivation
Spawn is the foundation of successful mushroom cultivation, so it’s important to understand what it is and how it works. Spawn refers to a substrate that has been inoculated with mushroom mycelium, which is the vegetative part of the fungus.
The mycelium grows throughout the substrate, breaking down organic material and preparing the environment for fruiting. When it comes to turkey tail mushrooms, there are a few options for spawn.
You can purchase pre-made turkey tail spawn from a reputable supplier, or you can create your own by growing out a culture on sterilized grain or sawdust. Regardless of which route you take, it’s crucial that your spawn is healthy and free from contamination.
How to inoculate your substrate with turkey tail spawn
Inoculating your substrate with turkey tail spawn is relatively simple. First, make sure your substrate is fully cooled after preparation and that all equipment has been properly sterilized.
Then, mix the spawn into your substrate thoroughly. Depending on the size of your operation, this could be done by hand or with specialized equipment.
Once you’ve mixed in the spawn, cover your substrate with a breathable layer such as wax paper or aluminum foil to prevent contamination. Place in an environment that mimics natural conditions for fruiting (such as 75-85% humidity) and waits for colonization to occur.
Tips for ensuring successful colonization
While inoculating with turkey tail spawn isn’t overly complicated, there are some tips you can follow to increase your chances of success:
1) Keep everything clean: Contamination can quickly ruin all your hard work if proper precautions aren’t taken.
2) Monitor temperature: Different strains of turkey tail mushrooms may prefer different temperatures during colonization. 3) Be patient: Colonization can take anywhere from a few weeks to a few months.
Don’t rush the process, and make sure the mycelium is fully colonized before moving to fruit. By understanding spawn and its role in turkey tail mushroom cultivation, following proper inoculation techniques, and implementing tips for successful colonization, you’ll be well on your way to harvesting your own delicious and healthy mushrooms at home.
Caring for Your Turkey Tail Mushrooms
Monitoring Growth Progress and Making Adjustments as Needed
Growing turkey tail mushrooms is not an exact science. It requires a keen eye and attention to detail.
The first few weeks of growth are crucial, as this is when you will be able to monitor the progress of your mushrooms. You should check on your mushroom farm every day to ensure that everything is going smoothly.
Keep an eye out for any deviations from the norm, such as discoloration or changes in texture. Once your turkey tail mushrooms start growing, they can be sensitive to changes in temperature, humidity, and light.
You will need to make adjustments as needed to ensure that they are growing at their optimal rate. This may mean adding a humidifier or adjusting the thermostat in your growing space.
Common Issues That May Arise During Cultivation and How to Address Them
As with any living organism, turkey tail mushrooms can be susceptible to pests and diseases.
The most common issue that growers face is contamination from bacteria or mold spores.
If you notice any signs of contamination, such as discoloration or unusual growth patterns on your substrate, it is important to act quickly. The best way to prevent contamination is by maintaining a clean environment throughout the cultivation process.
This means washing your hands before handling your substrate or spawn and using disinfectants on all equipment before use. If contamination does occur, there are a few steps you can take to salvage your crop.
First, remove any contaminated areas immediately and dispose of them properly. Then, adjust the conditions in your growing space (e.g., increase humidity levels) so that the remaining mushrooms have a better chance of survival.
Harvesting Your Mushrooms When They Are Ready
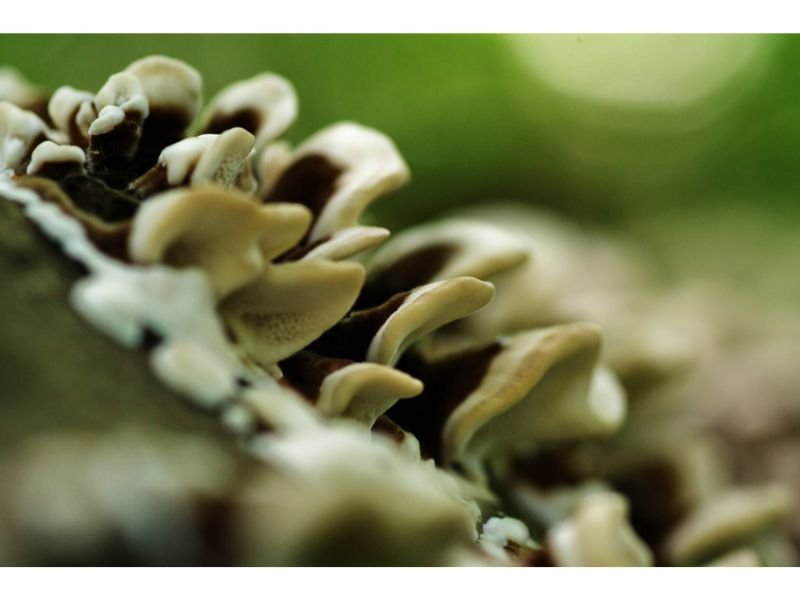
Harvesting turkey tail mushrooms requires patience and precision. It’s not just about picking the mushrooms at the right time; it’s also about preserving their potency and flavor. The best way to ensure a successful harvest is by observing your mushrooms closely and picking them when they reach maturity.
Mature turkey tail mushrooms have distinct colors and textures that indicate readiness. They should be firm to the touch and have a vibrant color.
It’s important not to wait too long to harvest your mushrooms, as they will lose potency and flavor over time. To harvest your turkey tail mushrooms, use a sharp knife or scissors to snip them off at the base of their stems.
Be careful not to damage any surrounding areas of the substrate, as this can lead to contamination or stunted growth in future batches. With proper care and attention, harvesting your turkey tail mushrooms can be a rewarding experience that yields delicious results.
Understanding the Health Benefits
Turkey Tail mushrooms have been used for centuries in traditional Chinese medicine and other ancient healing practices. These mushrooms are rich in bioactive compounds, including polysaccharopeptides, polysaccharides, and triterpenoids, which contribute to their remarkable health benefits.
Some of the potential benefits of Turkey Tail mushrooms include:
- Immune System Support: Turkey Tail mushrooms contain beta-glucans that can enhance and modulate the immune system, potentially aiding in the prevention and treatment of certain diseases.
- Antioxidant Properties: The abundance of antioxidants in Turkey Tail mushrooms helps combat oxidative stress and inflammation in the body, promoting overall well-being.
- Gut Health Improvement: The prebiotic effects of Turkey Tail mushrooms support a healthy gut microbiome, leading to improved digestion and nutrient absorption.
- Cancer-Fighting Potential: Research suggests that Turkey Tail mushrooms may have anti-cancer properties, particularly in supporting the immune system during cancer treatments like chemotherapy.
With such incredible benefits, it’s no wonder that more and more people are turning to Turkey Tail mushrooms as a natural and holistic approach to health and wellness.
How do you know if you succeed in growing Turkey Trail mushrooms?
If you see Turkey Tail mushrooms growing in your enclosed space, then you have succeeded in growing them! You can tell that they are ready to harvest when the caps are fully open and the spores have been released. The mushrooms will also start to turn brown and shrivel up when they are ready to be harvested.
how long does a turkey tail take to grow?
Turkey Tail mushrooms typically take a few weeks to a few months to grow, depending on the temperature and humidity levels in the growing environment.
A good temperature level is between 68-78 degrees Fahrenheit, with a humidity level of at least 80%.
If the temperature is too cold or the humidity is too low, the mushrooms will take longer to grow.
To speed up the process, you can try using a mushroom-growing kit that has everything you need to get started.
With the right conditions, you can expect to see Turkey Tail mushrooms growing in no time!
Beyond the Basics: Advanced Techniques and Tips
Exploring advanced techniques such as fruiting chambers, cloning, etc.
Congratulations on mastering the basics of growing turkey tail mushrooms! Now that you have a grasp on the fundamentals, it’s time to explore some advanced techniques to take your cultivation game to the next level.
One of those techniques is creating a fruiting chamber. A fruiting chamber is a dedicated space where you can control humidity, temperature, and air flow to encourage mushroom growth.
There are many ways to create a fruiting chamber, including using a clear plastic storage container or building one from scratch with wood panels and insulation. Whatever method you choose, make sure it’s sealed properly to maintain humidity levels.
Another advanced technique worth exploring is cloning your turkey tail mushrooms. This means taking tissue samples from your healthiest and most productive mushrooms and using them to create new cultures.
Cloning can help you rapidly increase the yield of high-quality mushrooms in your crop. It also allows for genetic diversification which helps in strain development.
Tips on how to maximize yield, potency, and flavor of your turkey tail mushrooms
Now that you have learned about some advanced techniques for cultivating turkey tail mushrooms let’s turn our attention towards maximizing yield potency as well as flavor. One way to increase mushroom yield is by optimizing environmental factors such as humidity levels (70-80%), temperature (60-70F), light intensity(around 500 lux), and carbon dioxide levels (under 1%). You also need patience; the growing time for Turkey Tail Mushrooms range between eight months or more depending on conditions.
To maximize the potency of your turkey tail mushroom harvests it’s critical that they’re harvested at their peak maturity when they are at their highest concentration of beta-glucans-polysaccharides responsible for its immune-supportive benefits. Once harvested correctly dry the mushrooms to maintain potency as well.
To maximize the flavor of your turkey tail mushrooms it’s important to understand the location grown, growing media, and time harvested. Turkey tail mushrooms grown on deciduous trees such as oak or cherry tend to have a more complex flavor than those grown on evergreen trees like pine.
As far as harvesting time is concerned, ideally harvest just before the caps begin turning upwards for improved flavor. Mastering advanced techniques for growing turkey tail mushrooms will take some trial and error, but with patience and persistence, you can cultivate a productive and high-quality crop.
Incorporating these tips will not only increase yield but also enhance the potency and taste of your harvests. So gear up for another exciting phase in cultivation!
Conclusion: Enjoying the Fruits of Your Labor
Recap of Key
In this comprehensive guide, we have explored the process of growing turkey tail mushrooms at home. We have covered everything from setting up your growing space, preparing your substrate, inoculating it with turkey tail spawn, caring for your mushrooms, and exploring advanced techniques to maximize yield and flavor.
Growing turkey tail mushrooms at home require patience, attention to detail, and a sincere passion for cultivating fungi. But the rewards are worth the effort.
Not only does it allow you to enjoy fresh, organic turkey tail mushrooms that are rich in medicinal properties but also saves you money as well as reducing your carbon footprint by consuming locally grown food. By following these steps and tips outlined in this guide you can not only grow a healthy harvest of turkey tail but also learn valuable skills that can be applied to other mushroom species as well.
The Value of Growing Your Own Food
Growing your own food is an essential aspect of living a healthy and sustainable lifestyle. It allows you to take control over what you eat and how it is grown. When you grow your own food, you know exactly what goes into it and how it is produced.
In today’s world where much of our food is processed or shipped long distances by fossil fuel-consuming transportation systems; growing food locally has become even more important than ever before. By growing your own food at home, not only do you reduce reliance on fossil fuels but also contribute to a culture that values self-sufficiency.
Final Thoughts: Embracing the Power of Nature
As we come to the end of this journey together let us take time to appreciate nature’s power in providing us with such wonderful gifts. Growing turkey tail mushrooms at home offer an opportunity for us all to connect with nature in a meaningful way while improving our health and well-being.
So, let’s embrace the power of nature and keep on cultivating these valuable mushrooms that have been used for centuries in traditional medicine to support health and vitality. By investing time into growing our own food, we can make a positive impact on our health, communities, and the planet as a whole.

Gardening is my passion and growing plants indoors has always been a stress relief for me. Grow a banana tree in my apartment once (although failed to produce bananas).


Thank you very much for this wonderful information. I hope to grow my own soon. In full remission, Turkey tail everyday.